Camp Westfalia

Author Archive for Jeffrey Lee – Page 3

Dometic RM182 Refrigerator Instructions

NOTE: the following text and photos are excerpted from the 1983 Camper “Supplement to Volkswagen Vanagon Owner’s Manual.” For more info on operating the fridge see, “Using the Westfalia Refrigerator.”

Downloads
1980-1985 Vanagon Westfalia Campers: “Supplement to Volkswagen Vanagon Owner’s Manual”
1986-1990 Vanagon Westfalia Campers: “Supplement to Volkswagen Vanagon Owner’s Manual”


Refrigeration

The controls for gas/electric refrigeration are arranged along the top edge of the refrigerator. They are accessible by opening the refrigerator door.

A: Pump Knob
B: Safety Valve Button
C: Thermostat Control Knob
D: Voltage Selector Switch
E: Gas Valve Knob
F: Flame Indicator Light

Startup Procedure for Propane Operation:

  1. Turn the gas valve on propane tank to ON.
  2. Move the Voltage Selector Switch (D) to GAS (center position).
  3. Turn Gas Valve Knob (E) to ON.
  4. Turn Thermostat Control Knob (C) clockwise to MAX.
  5. Pull Pump Knob (A) and pump in and out at least 15 to 20 times.
  6. Press and hold Safety Valve Button (B), at the same time push Pump Knob (A) in completely until an audible click is heard.
  7. Continue to hold Safety Valve Button (B) until the Flame Indicator Light (F) in the sink cabinet control panel comes on and remains on. This should require about 15-30 seconds.
  8. If the Flame Indicator Light (F) does not come on, or if it flickers on but goes out again, the pilot light has failed to ignite to a steady burn. This might happen if the refrigerator has not been used for some time, or if the outside temperature is low. Repeat steps 5-7.
  9. After a few minutes, check the Flame Indicator Light (F) again, to assure yourself that the pilot light is still burning. The pilot light flame can also be observed through the sight glass in the lower left hand corner of the rear wall inside the refrigerator.
  10. Should the pilot light snuff out unexpectedly, the Flame Indicator Light (F) will also go out, and the thermocouple safety valve will automatically shut off the gas flow.
  11. Temperature inside the refrigerator can be regulated with Thermostat Control Knob (C). The center position will usually maintain sufficient cooling. In hot weather, or when more cooling is required, turn the knob toward MAX.

To discontinue gas operation:

  1. Turn Pump Knob (A) to OFF.
  2. Turn Gas Valve Knob (E) to OFF.
  3. Turn Thermostat Control Knob (C) to GAS MIN.

To assure yourself troublefree gas refrigeration at altitudes above 6500 feet or 2000 meters, it is necessary to install a smaller gas burner jet. Therefore, if you use your camper predominantly at high altitudes, the no. 24 jet installed in the burner tube should be replaced by a no. 22 jet. Contact the Dometic Refrigerator Service center in your area for this service.

NOTE: When the liquid propane tank is refilled, air will remain in the gas line. Before using gas refrigeration, we recommend bleeding the system by lighting the burners of the gas stove. Let burners burn for about one minute. This will help air escape more rapidly.

Procedure for Electric Operation:

  1. Move Voltage Selector Switch (D) to AC 120 V.
  2. Make sure Gas Valve Knob (E) is in OFF position.
  3. Turn Thermostat Control Knob (C) clockwise to MAX. When the refrigerator interior is sufficiently cold, turn Knob (C) from MAX to an intermediate setting.

The 12 Volt power supply from the vehicle battery can be used only when the engine is running and the Voltage Selector Switch (D) is set on DC 12 V.
The 12 V circuit is not thermostatically controlled.

To Discontinue Electric Operation:

  1. Move Voltage Selector Switch (D) to GAS (center position).
  2. Turn Thermostat Control Knob (C) to GAS MIN.

Defrosting the Refrigerator

Keep an eye on the ice formation on the evaporator core. Too much ice build-up reduces cooling efficiency. We recommend frequent defrosting. Never let the ice thicken more than 1/8” (3-4 mm).

Make sure that Gas Valve Knob (E) is in OFF position, and that Thermostat Control Knob (C) is in the GAS MIN position.

Empty the refrigerator, leave the door open and let the ice melt into the catch basin below. Pull the basin out to empty the water and dry off before reinstalling.

Cleaning the Refrigerator

Clean the refrigerator interior with a solution of lukewarm water and baking soda.

To keep the door seal air tight, clean the seal around the door with clear water only. Chemical additives, oil and grease much to come into contact with the seal.

Ventilation

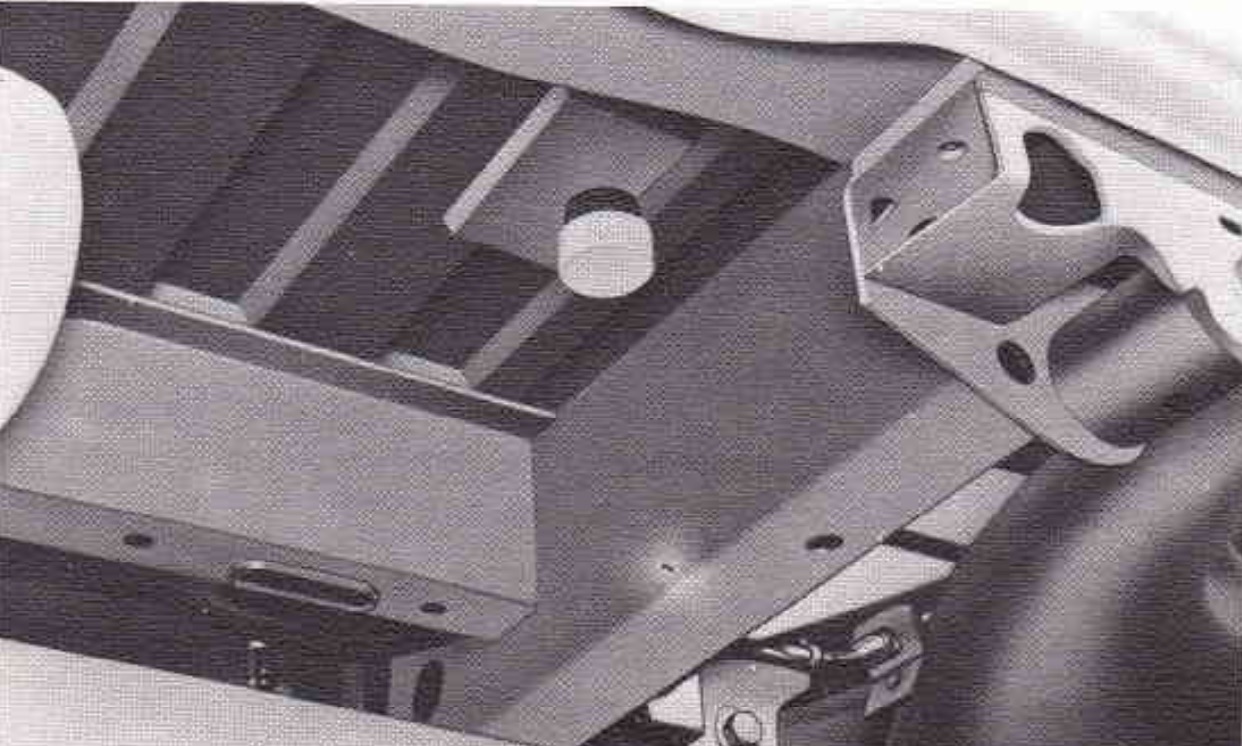
Keep all vent openings clean and unobstructed to assure efficient cooling. Vent openings are located below the refrigerator door, behind the heart shield of the gas range, in the left sidewall of the sink cabinet, and in the left outside panel of the vehicle.

Inspect the propane tank and lines periodically for tightness and leaks. Use soapy water to test for leaks — NOT MATCHES.

Start refrigerator several hours before storing food. Precool or freeze food items at home before loading your Camper refrigerator.

Leave spaces between food and drink items for the necessary air circulation. Use unbreakable plastic containers and bottles, and seal them tightly to prevent spilling.

Condensation

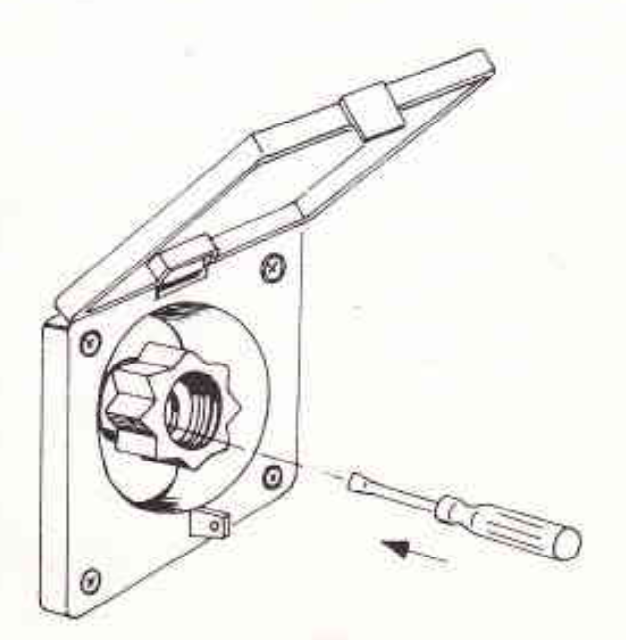
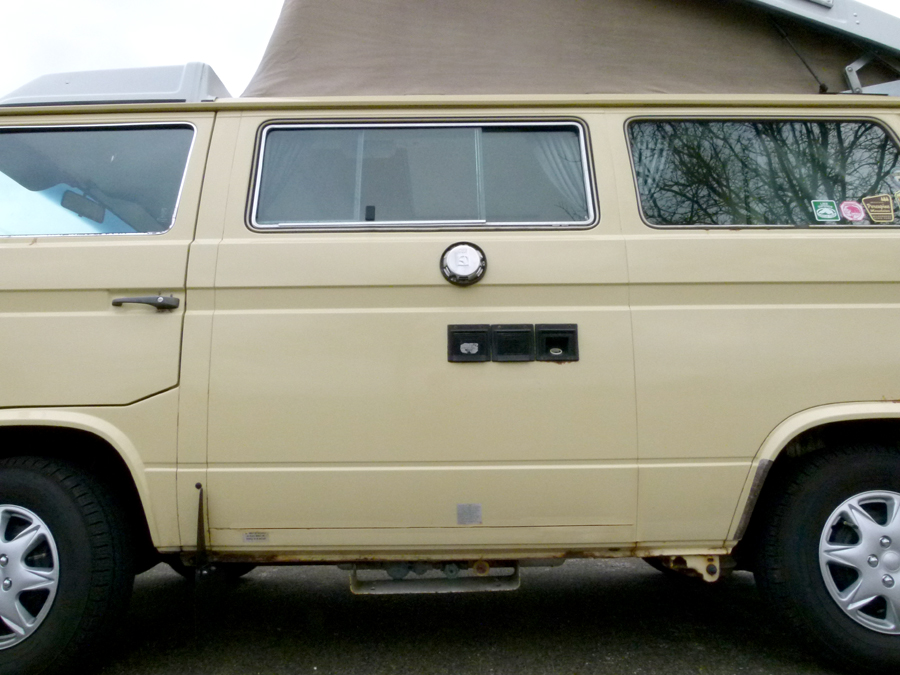
The FLUE VENT must be kept uncovered at all times.

Only when you wash the Camper, or while taking the vehicle through an automatic car wash, should the Flue Vent be covered.
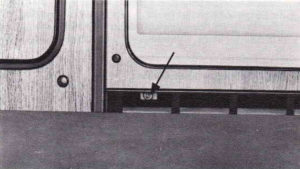
To drain accumulated water due to normal condensation, open the screw on the condensation drain pipe (arrow).

When the refrigerator is operating, be sure to park on level ground to maintain efficient cooling. If the vehicle remains stationary for any length time on gradients exceeding +/-8˚, the cooling output will be considerably reduced. Should level ground parking be unavailable, it is best to discontinue operation to prevent overheating of the core which can lead to permanent damage of the refrigerator.

Using the Vanagon Westfalia Refrigerator

The Vanagon Westfalia Camper refrigerator is convenient and efficient; here’s how to use it.

No camper-van kitchen is complete without the ability to keep your food cold to preserve it and prevent spoilage. And the value of a cold beer or soft drink at the end of a long hot day of road tripping requires no explanation …

Full operating instructions excerpted from the “Supplement to Volkswagen Vanagon Owner’s Manual” for the 1983 Camper can be found here >>

Introduction

The Vanagon Westy Dometic RM182 refrigerator is located in the lower kitchen cabinet, immediately below the stove. At 1.5 cubic feet (45 liters) of interior volume, it’s a little smaller than a dorm-room mini-fridge, so smart packing is required.

Generally speaking, when the original Dometic is in good working order, it is capable of keeping food about 40-50 degrees Fahrenheit (or 20-25 degrees Celsius) below ambient air temperature. It will struggle to keep food at safe temperatures when temps inside the van exceed 90-100˚F (32-38˚C).

The refrigerator interior features two moveable shelves, and two additional compartments on the inside of the door for small food items, bottles, or cans.

In the upper-rear of the fridge interior is the evaporator core, or cooling element. When ice occasionally forms on this evaporator, turn the fridge off to defrost and allow the ice to melt.

Power

The Westy refrigerator is operated by one of three power sources:

120-volt AC electrical power (household or shore power)

To use this, connect an extension cord from a nearby power outlet to the van’s external power inlet on the side panel near the other utility hookups. The fridge is very effective when powered this way, keeping food quite cold.

12-volt DC (alternator or auxiliary battery)

In stock form, Westfalia Campers were equipped with a relay to allow the fridge to be powered by the alternator whenever the engine is running. It automatically cuts all power to the fridge when the engine is stopped, to prevent draining the starting battery.

Some owners add a second, auxiliary battery to their van and wire it through a relay or other circuits in order to power the fridge via 12V for longer periods.

Liquid Propane (LP)

The fridge can also be fueled by the same external LP tank as the Westfalia stove. Just after the main shutoff valve and two-stage LP regulator attached to the tank, the supply splits into two copper lines: one feeds the stove, and the other the fridge.

The fridge is also very efficient when powered this way, with a full LP tank supplying the fridge 24/7 for at least a full month before requiring a refill.

See below for more info on starting and operating the fridge on LP.

Effectiveness

As for temperatures, the Dometic fridge will attain its coldest temps when powered by (in order):

  1. 120-volt AC
  2. Liquid Propane
  3. 12-volt DC

Controls & Operation

The Dometic controls are located inside the fridge door, just above the main compartment.

Full operating instructions excerpted from the “Supplement to Volkswagen Vanagon Owner’s Manual” for the 1983 Camper can be found here >>

The Fridge Routine

As outlined in “The Routine,” here’s a brief synopsis of running your fridge during a typical trip:

Pre-Trip Preparation, often the day prior to departure

  • Ensure that LP (liquid propane) tank is sufficiently full, and that main shutoff valve on tank is closed
  • Pre-chill refrigerator overnight on 120V AC shore power; add cold beverages to provide thermal mass

Hitting the Road, the day of departure

  • Load any remaining cold food into pre-chilled refrigerator
  • Disconnect refrigerator from 120V AC shore power, switch to 12V DC, or open main LP valve and light for driving

Arrive in camp:

  • Park van using parking brake and, if necessary, RV levelers
  • Open main shutoff valve on LP tank to operate refrigerator on liquid propane, switch refrigerator control to LP, and light
  • If 120V AC power is available, you can optionally power the fridge with this; use extension cord to connect campsite shore power station to camper hookup; switch refrigerator to 120V AC

Breaking camp

  • Disconnect 120V AC shore power and water hookups
  • Close main shutoff valve on LP tank, switch refrigerator to 12V DC or LP for driving

Post-Trip Cleanup

  • Turn refrigerator off; remove remaining food and wipe clean

Tips & Tricks

In addition, here are some insights gained from many years of operating these compact, convenient, efficient, but sometimes fretful fridges.

Pre-Chill on 120VAC Shore Power

The Dometic fridge does well at maintaining cool temps, but benefits from a head start. A few hours before using your fridge, plug it into shore power to pre-chill it. The thermal mass of a cold six-pack inside will further aid pre-chilling, and help make the fridge easier to light on LP later.

Pack it Cold

When loading foodstuffs in the fridge, try to use pre-chilled food whenever possible, so the fridge needn’t struggle to get/stay cold.

Check It Out

As mentioned in the Owner’s Manual instructions, the Flame Indicator Light will tell you the fridge’s LP chamber is still burning. But you can also easily confirm the fridge’s continued operation from outside the van by feeling the exterior vent with your hand: a bit of warmth here indicates the fridge’s LP chamber is still burning.

Just Chillin’

A small clip-on RV fridge thermometer lets you monitor your fridge’s interior temps; a simple analog model requires you open the fridge door to have a peek (losing some of your precious cold air), while a wireless version works remotely.

Stay on the Level

When parked, the Dometic fridge must always be kept somewhat level; the Owner’s Manual specifies no more than +/- 8 degrees on incline, to prevent overheating and permanent damage to the heating element. A set of RV levelers and level indicators will help you find a suitable parking spot.

Made in the Shade

To help the fridge keep your cucumbers cool, choose a parking spot or camp site out of direct sunlight, and if possible open a couple of windows an inch or so to keep the van interior cooler.

Periodic Maintenance

Though usually very trouble-free, the Westfalia’s Dometic fridge may sometimes be difficult to light, or fail to keep your food cold. Here are some ideas to try before removing the fridge for DIY service.

Photo: Shooftie

Suck It Up

The fridge’s exterior vent houses two conduits: air intake and exhaust vent. These can become plugged with debris which can make its way down to the burner chamber: leaves and seeds, dead bugs, spider webs, etc.. Remove the outer vent cover to expose the two conduits, and alternately apply the end of a shop vac to each one to clean out any accumulated junk.

Clear the Air

Igniting the LP burner requires a bit of fresh air in the burn chamber, usually provided by the tiny pump built into the ignitor knob. But over time this pump can begin to fail, making ignition difficult. If you’re having problems, remove the cap from the small condensation drain pipe below the fridge and attach a bicycle pump. Give it several strokes of fresh air, and try igniting the fridge again.

Hope this helps you enjoy your own Westfalia Dometic fridge. And if you have any fridge questions or suggestions, post ’em up below!

Hot Dog!


Oscar Meyer Wienermobiles, with a side order of German mustard!

Driving past Oscar Meyer headquarters one day, I spotted a half-dozen of the iconic Wienermobiles assembled in the parking lot. I wheeled the Westy in to admire these monumental monstrosities of meat, glistening in the sun and neatly arrayed as if fresh off the grill at a family cookout.

Elsewhere in the parking lot there was a basic road course outlined in orange traffic cones. I can only assume the current graduating class of Wienermobile pilots—officially known as Hotdoggers—were preparing for their high-performance driving lessons. From the looks of the road course, this would involve tight low-speed curves, panic skid stops, convoluted Y-turns, and a sausage-y slalom.

I grabbed a few photos, went about my errands, and when I returned, the hot-rod hot dogs had been joined by the Planters Mister Peanut Nutmobile.


Original Vanagon Westfalia Toilet & Cabinet

Making boom-boom the European way, mit die Defäkation Karton!

We recently sold our original-equipment portable chemical toilet with wooden cabinet. Though the previous owners seldom used it, and we never did, I thought I’d share these photos and a bit of history for the sake of posterity.

Apparently available only to those customers who picked up their new Vanagon Campers in Germany as part of VW’s tourist delivery program, the cabinet boasts classic Westfalia design.

Reproductions Now Available here


This authentic vintage piece features a sturdy plywood cabinet with the familiar Westfalia laminate finish, and a padded seat top upholstered to match the interior of the early Vanagon Westies.


The enclosed Porta-Potti is a compact two-chamber toilet: open the lid and do yer bidness, pull the front handle to open the bowl valve, and give the unit a couple of flush pumps to rinse the bowl clean; then close the valve. Waste is collected in the sealed lower chamber, preventing odors. When full, simply empty into any campground toilet or sanitary station, rinse, and continue using! Refresh with common RV toilet chemicals available at any RV supplier.

Made by Thetford, still the world’s leading manufacturer of mobile sanitation products for the RV, marine, camping and truck markets.

Here’s more info on operating one of Thetford’s similar models: https://www.youtube.com/watch?v=kyhqPO3TfYA

When you don’t need a toilet for your trip, the entire combo can be easily removed for storage, or simply remove the toilet and just use the cabinet as a basic storage compartment with convenient padded seat top!

The Westfalia-Thetford portable toilet combo is a classic piece of vintage camping kit, and ready to ‘go’ wherever you go!

Reproductions Now Available here

Due to the surprising amount of interest in this unique vintage item, even after it was sold, I took some measurements, made some blueprints and started makin’ sawdust …

I can now offer a handful of these very authentic reproductions of the toilet cabinet, in both Beige/Brown and in Gray.


These reproduction cabinets are the same approximate dimensions as the original (but sized to fit popular modern Porta-Potties), utilize all the same materials (laminated birch plywood, trim, hardware, etc.), and are upholstered in new complementary fabrics.

Check them out, and contact me with any questions!

Jeffrey Lee
Camp Westfalia

Vanagon or Westfalia Gift Ideas

Looking for the perfect Vanagon or Westfalia gift for a loved one? (Or for you?)

These gifts will keep your favorite camper (or camper van) safe, comfortable, entertained, and looking good!

Therm-a-Rest Compressible Travel Pillow for Camping, Backpacking, Airplanes and Road Trips

  • Ultralight compressible travel pillow with soft foam filling that packs down small for road trips, plane travel, camping, and backpacking
  • Foam filling expands into a 4-inch thick pillow for head, neck, and back support in tents, cars, planes, and other tough-to-get-comfortable places
  • Compact design packs into a backpack, duffle, suitcase, or tote; drawstring and cord lock keeps pillow securely compressed when not in use
  • Brushed polyester cover is soft against skin for comfort; lofty urethane fill is an upcycled byproduct of Thermarest mattresses
  • Machine washable
  • Made in the USA

Get it here!

Budge Protector IV Van Cover, 4 Layer Reliable Weather Protection, Waterproof, Dustproof, UV Treated Van Cover

The Protector IV van cover is a completely unique 4 layer van cover. This van cover is made from 4 durable layers that work together to provide unparalleled waterproof protection for your vehicle. This all weather cover combines two layers of exceptionally waterproof polypropylene with an interior waterproof membrane while the inner most layer of the cover is comprised of a non abrasive fleece-like material. This van cover is also UV treated to protect against harsh sun exposure. This van cover will repel rain, water, snow, dust, dirt and much more. This cover is suitable for long term outdoor storage and will remain durable overtime. Covers comes with a strap and buckle system to help keep the cover secure to your van and to prevent billowing from windy weather.

  • EXCELLENT WEATHER PROTECTION: Van cover is 100% waterproof and UV resistant for superior outdoor protection
  • DURABLE: This all weather van cover is made from 4 durable layers
  • SECURE YOUR COVER: This cover includes straps and buckles to easy tie down and is nonabrasive to your van’s finish
  • DESIGNED TO FIT: This van cover fits vans 228″ L x 72″ W x 72″
    Fit type: Universal Fit

Get it here!

“Blue Highways: A Journey into America”

Hailed as a masterpiece of American travel writing, Blue Highways is an unforgettable journey along our nation’s backroads.

William Least Heat-Moon set out with little more than the need to put home behind him and a sense of curiosity about “those little towns that get on the map-if they get on at all-only because some cartographer has a blank space to fill.”

Get it here!

Camp Westfalia Merch Store

Unique and custom VW Bus & Vanagon camping designs, available on a variety of tee shirts, hoodies, mugs, and more.

Wear your love of VWs and van-camping with pride!

Shop here!

Blue Royal Hippie Van Tumbler Cup with Lid, Thermos Insulated Travel Coffee Mug

  • TRIPLE INSULATION TECHNOLOGY: Each 64Hydro tumbler has double-walled, vacuum-sealed and copper-coated insulation, which helps keep drinks cold for up to 24 hours & hot for up to 12 hours.
  • CONSTRUCTED OF 18/8 STAINLESS STEEL: Known for its strength and purity, our 18/8 food-grade tumbler won’t break, rust, retain or transfer flavors. Unlike other tumblers, our tumblers provide a clean, non-metallic taste.
  • ANTI-LEAK, BPA-FREE FLIP LID: Each tumbler comes with an Anti-Leak, BPA-Free flip lid. The lid will prevent any accidental spills. Anti-glug hole ensures the smooth flow of water and a comfortable drinking experience. NO SWEAT, NO PROBLEMS: Our copper wall layer creates a condensation-free exterior that won’t sweat on your hands or in your bag.

Get it here!

ENO Eagles Nest Outfitters – DoubleNest Hammock

This comfortable hammock is versatile, durable, and compact, making it perfect for traveling, hiking, or chillin’ in camp. The strong nylon taffeta fabric and roomy design accommodate up to 400 pounds, so you can relax with a friend or just hog the whole thing for yourself. Built to last with triple-stitched seams, this baby will keep you swinging for a long time.

Get it here!

TOPDC Double-Cylinder Portable Air Compressor

Vanagon travellers tend to wander off the beaten path, often finding themselves far from major highways, and perhaps beyond reliable phone reception. Self-reliance is crucial, and a portable compressor like this can be a real trip saver.

The TOPDC Double-Cylinder Air Compressor fits neatly in the storage space beneath the Vanagon bench seat, and gives the assurance and peace of mind when travelling in the backcountry. With its compact size, weight, and versatility for other tasks, there’s no reason not to carry one of these as part of your emergency tool kit.

Full Review Here

Get it here!

Flower Power

Sometimes, when diesel is difficult to find, the Camp Westfalia rig runs entirely on alternative fuels. Like, Groovy Vibes, man!

Once, while parked and waiting for Lorie to return with coffee, I was approached by an old farmer who couldn’t resist asking me if I was a ‘real hippie’. I reached out the open window, peeled one of the many magnetic flower decals off the van and waggled it in the air. “Nah,” I replied, “I’m only a hippie on the weekends.”

Get ’em here!

“Out West: A Journey through Lewis and Clark’s America”

One hundred and eighty years after Lewis and Clark’s “Voyage of Discovery” (1804–1806), Dayton Duncan set out in a VW Camper to retrace their steps.

Out West is an account of three separate journeys: Lewis and Clark’s epic adventure through uncharted wilderness; Duncan’s retracing of the historic trail, now in various ways tamed, paved, and settled; and the journey of the American West in the years in between.

Get it here!

GSI Outdoors – Bugaboo Backpacker, Nesting Cook Set

This compact nesting cookset is perfect for preparing meals in a crowded camper van, and is the perfect companion to the GSI Bugaboo folding fry pan!

  • DURABLE AND LONG LASTING: The Bugaboo Backpacker is coated with Teflon Classic for good non-stick performance. Features a crushproof, heat-resistant nylon strainer lid and an easily removable folding pot handle.
  • EASY STORING AND CLEAN UP: Waterproof stuff sack holds set together and doubles as a sink or washbasin.
  • COOK WITH CONFIDENCE: Folding pot handle locks onto exterior brackets on pot and fry pan to provide a secure handle while cooking.

Get it here!

2023 GoWesty Calendar

The 2023 Westy Life calendar features inspiring VW camper images sure to pique your wanderlust! Their annual calendar contest drew over 400 entries from around the world—and the caliber of the entries was incredible.

Get it here!

Vanagon Workshop Manuals

“The Bentley” Official Factory Repair Manual

Volkswagen Vanagon Repair Manual: 1980-1991

This Official Factory Repair Manual, published by Robert Bentley, is rightfully considered “the bible” for Vanagon repair.

This was the manual used by the wrenchers at your local VW dealership, but now that most VW technicians have lain neither eyes nor hands on a Vanagon, the Bentley is used only by the occasional independent shop and by shade-tree diehards like you and me. It remains the final authority in accuracy and precision, providing the proper sequences, torque values, and tolerances for most repairs. Repairs are well organized by topic and sub-topic.

Get it here!

VW T1 Bus BBQ Utensil Set with Carrying Case

Campervans are perfect for chillin’ and grillin’.

And this set of barbecue tools combines the best of both. Stainless steel utensils embossed with classic split-windshield Busses, and featuring bamboo handles, these cool tools come packed in a nylon carry case.

Get it here!

Christmas Vacation – Heavyweight, Tear-Resistant,  Holiday Gift Wrapping Paper

Whatever gift you decide on for your favorite camping companion, apply the final classy touch and wrap it in this limited edition decorative Camper Van design!

Get it here!


From the Camp Westfalia crew, here’s wishing you and yours a happy holiday season, and a Happy (Camper) New Year of adventures!

Lake Superior Circumnavigation 2

The Camp Westfalia crew recently embarked on another Lake Superior Circle Tour: 1000 miles around the wild and rugged shores of the Greatest of the Great Lakes. Ride along!

We drive north today toward the inland sea of Lake Superior. Happily cruising along in very light traffic under sunny skies, when suddenly an old El Camino in the right-hand lane veers left in front of us, to cross the median. I throw the wheel over hard to the left and lock up the Vanagon’s brakes, and we go into a four-wheel crabbing skid. We finally stop in the median cross-road, only five feet from his door.

The eighty-year-old driver smiles and goes on his way, apparently oblivious to his deadly mistake. I scowl and go in search of a good stiff drink to settle my nerves …

From Duluth we continue north along Minnesota’s North Shore. Make it as far as Grand Portage, Minnesota, where we have a late-night slice of pizza in the casino cafe. We take a site in the adjacent RV park overlooking the marina, and settle in among the retirees squandering their 401k’s in the casino.

“Lorie’s Lounge” is soon open and (as previously mentioned) I finally enjoy my long-awaited adult beverage …

Sunrise on Lake Superior.

Our border crossing is uneventful, and we soon hit Thunder Bay, Ontario.


After a quick tour of the Sleeping Giant peninsula, we continue eastward along the Trans-Canada Highway, around the northernmost point of Lake Superior. Late afternoon finds us in Rossport, Ontario, where we stop at Rainbow Falls Provincial Park for lakeside camping on the Inland Sea …


We cruise the north shore today, rolling through rugged and rocky Canadian Shield country. Cold inland lakes glitter between granite mountains.

Exploring remote forest roads often leads to beautiful new discoveries. Sometimes not …


We finally camp at Pukaskwa National Park.


At Young’s General Store in Wawa, Ontario we are greeted by one of the city’s famous gargantuan geese. This particular bird was recently retired, and replaced by a new stainless steel model, which can be seen right from the highway.


Another fantastic campsite right on the beach at Agawa Bay Campground.

There are a few advantages to travelling in the off season: no crowds, no noise, no bugs (my god, the bugs!). In fact, not much of anything at all …


Pancake Bay Provincial Park. Legend has it when Lake Superior voyageurs camped here, they knew they were only one day away from fresh supplies in Sault Ste. Marie. So they used up the last of their flour and enjoyed a big ole batch of pancakes.

Mmmm, pancakes …


Having nearly completed our loop of the lake, I realize the Westy is entirely too clean. So, before turning south for home, we let her off the leash for a bit of backwoods romping in the dirt.

For an unabridged account of one of our Lake Superior Circle Tours, check out “A Superior State of Mind.”

Product Review: ASUS Eee Pad Transformer 10.1-Inch Tablet

A compact, lightweight, unlocked 10.1 inch tablet great for van-camping and other travel

ASUS Eee Pad Transformer TF101-B1 32GB 10.1-Inch Tablet

Specifications

  • 10.1-inch WSVGA IPS capacitive pressure-sensing multi touch display for brilliant HD entertainment and intuitive navigation. 178° viewing angle (1280 x 800)
  • Powered by NVIDIA® Tegra™ 2 mobile processor for best web experience with up to two times faster browsing, hardware accelerated Flash, and console-quality gaming
  • Front (1.2 MP) and rear (5 MP) cameras for face-to-face video chats and on-the-go video and picture capturing
  • Mini HDMI port to supersize your entertainment to compatible HDTVs and external displays
  • Optional Docking station with QWERTY keyboard adds additional 6.5 hours of battery life, to instantly turn the Transformer into PC mode with up to 16 hours of battery life.

Staying organized and connected while on extended road trips can be difficult. So, we continually put a number of compact mobile digital devices to the test while travelling. How does the ASUS Transformer measure up?

First Impressions

The ASUS Transformer is an attractive little tablet. This is a 10-inch tablet, with Tegra power, great viewing angles and it has good sound. The device feels very solid in hand, not too light, not too heavy, with enough memory for lots of apps and it functions very well. The optional keyboard docking station adds even greater usability and versatility. Battery life is excellent too!

On The Road or In Camp

I purchased the ASUS Transformer based on the excellent reviews it was getting and it does not disappoint. In addition to the tablet, I decided to get the keyboard docking station, which is really an amazing accessory. The tablet itself is super responsive, has a decent amount of memory and is light enough to use for long periods.

For travel, it is more durable than some of my other devices and with the optional keyboard it is like having a mini laptop. It streams media such as Netflix, HULU, HBOGo, etc. without any lag and runs nicely. The 10.1 inch screen is great, but I actually like a bit smaller screen, so my 9.7 is the go-to tablet for travel. Nonetheless, I really do think this tablet is an excellent value, and highly recommend it.

The ASUS Eee Pad Transformer TF101 Mobile Docking station keyboard is made for the Transformer TF101 and is a great accessory. The docking station not only extends the tablet’s battery life up to 16 hours, but also features added functionalities which include a near full-sized QWERTY keyboard, a multi-touch touchpad, 2 USB 2.0 ports, and a 4-in-1 SD card reader.

You can also use any wireless mouse with the docking station, which is great if you are not a big fan of just the touchpad or touch screen. I prefer a smaller mouse so I am using the Ckeyin Bluetooth Optical Mini Mouse for Computers and Android Tablets, Smartphones.

There is also a wide selection of cases for it too, like the PadFolio Smart Cover Stand Alone Case. Its soft interior protects from bumps and scratches, offers easy access to all ports, the secured velcro locks in your tablet in to place, the cover has flip capability to transform the case into a horizontal viewing stand, and it has a magnetic closure. Available in a variety of colors.

In The Long Run

The ASUS Transformer is a pretty slick tablet for travel. The docking station adds even more features and capabilities. Even with the docking station, when folded together it is compact and stows in all those small Westy spaces. It also provides me the flexibility to work on the road if I need to. It has plenty of internal data storage and two options for expandable storage, a micro SD slot in the table and a full SD slot in the docking station, for other media, like videos. The display is bright, colorful crisp screen is great for watching movies. For the price, I would definitely recommend this tablet.

Hits: long battery life (without the keyboard dock’s extra power source), lightweight, Well made, sturdy construction quality and capabilities for the price

Misses: bottom speakers can get blocked during handheld use, would be nice if it included a longer charging cord.

Get the ASUS Eee Pad Transformer TF101-B1 32GB 10.1-Inch Tablet here

Using the Westfalia Stove

The Vanagon Westfalia stove makes camp cooking easy and efficient.

The stove in our Westfalia Camper has enabled us to start countless days of roadtripping with a belly-filling breakfast, whip up a quick lunch or a hearty dinner, or to enjoy a cup of hot cocoa while watching snow flurries descend from the icy peaks surrounding Crater Lake.

The Westfalia galley kitchenette is one of the distinguishing features which truly makes a Vanagon a Campmobile!

Full operating instructions excerpted from the “Supplement to Volkswagen Vanagon Owner’s Manual” for the 1983 Camper can be found here >>

Introduction

The Westy stove is fueled by the same external LP (Liquid Propane) tank as the Dometic refrigerator. Just after the main shutoff valve and two-stage LP regulator attached to the tank, the supply splits into two copper lines: one feeds the fridge, and the other the stove.

Inside, prop the kitchen cabinet lid open to reveal the stove, right next to the sink. A large oval grate covers the two gas burners, and beneath that the large stainless steel base catches the inevitable spills.

Above, mounted to the kitchen cabinet lid, is a stainless steel heat shield to protect the underside of the cabinet lid. On Canadian models, this deflector is permanently affixed; on US models, this heat shield can be unsnapped and hinged downward to lay flat, to serve as a drain board when washing & drying dishes (note the angled surface and small drain slot over the sink).


NOTE: Many new Westfalia owners mistakenly assume this heat shield/drain board is a griddle or hot plate, and commence to fryin’ bacon or flippin’ flapjacks on it. This will quickly discolor and buckle the heat shield, and food will stick and burn. DO NOT USE IT AS A COOKING SURFACE.

If your Vanagon’s previous owner neglected to remove the blue plastic protective film from your heat shield, do it now.

Lighting

The burner controls for the stove are located on the front kitchen panel. Look for the three flame symbols on the edge of the control knobs, indicating OFF, HIGH, and SIMMER.

To light the stove, first make sure the main valve is opened on the external LP tank. Depress and turn the stove burner knob to HIGH, and listen for the quiet hiss of gas from the burner. Use a butane lighter or a stove ignitor to ignite the flame, and adjust for cooking. Just as with your home barbecue grill, if it’s been awhile since your stove was used, or you ran completely out of LP before refilling the tank, you may need to run both burners for awhile to prime the supply line before it will light.

Once lit, simply adjust the flame for whatever type of cooking you’re doing. A larger pan or pot on the stove can block your view of the flame, but the flame can be seen reflected in the stainless steel base beneath the burners.

Cooking

On some Westfalia stoves, the SIMMER setting may allow the flame to go out, so set the control knob just a little higher.


Note that the burner grate stands on ten short ‘legs’; two of these legs engage in a couple of holes in the lower stove base. To remove the grate for cleaning, grasp the leg nearest you when standing in front of the stove, and firmly pull toward you to disengage the leg from the base, and lift the entire grate free.

Propane generally provides very even heating, but hot spots and scorching can be further prevented by using pots and frypans with fine heat-dispersing grooves engraved on the bottoms. We typically use lightweight nesting backpacking pots and frying pans with folding or detachable handles to save space. Be careful when using very small pots on the stove though, as these may tip or topple through the rather large central gaps in the grate. You can add versatility to your stove by adding a double-wide griddle for large-volume frying.

We also use a vintage teakettle for heating water for tea, instant soups, dishwashing, etc.. When not being used, it rests inside the sink, wrapped in a dish towel to prevent rattles.

Always allow the stove to cool after using and before stowing away for travel. To prevent annoying metallic rattles of the grate and the heat shield while underway, lay a couple of hot pads or dish towels over the grate before closing the lid.

Finally …

The stock stove is a crucial feature that adds great utility to the Westfalia Camper. We use ours on a daily basis when traveling, for everything from simple hot water to full-on multi-course meals. With adequate ventilation and tidy cooking habits, you can avoid lingering food odors unless you enjoy a lot of bacon or fried fish.

A comparable Coleman two-burner camping stove requires frequent refills of a highly flammable fuel which must be handled and carried somewhere on board. By contrast, the Westy stove-and-fridge combo will run on LP cleanly, safely, and economically for at least 30 days and nights before requiring a $7 refill.

I will never forget the taste of a pair of fresh pan-fried brook trout, resting on warm beds of wild rice, accompanied by cold bottles of beer, enjoyed with a longtime friend on the grassy banks of the very stream in which he’d caught them only minutes before.

Few things bring together family and friends like good food, and the Westfalia stove often makes it possible …

Have any questions or comments about the Westfalia stove? Post ’em below, and use the social links to share with friends!

Vanagon Westfalia Water System Instructions

NOTE: the following text and photos are excerpted from the 1983 Camper “Supplement to Volkswagen Vanagon Owner’s Manual.” For more info on operating the water system and sink see, “Using the Westfalia Kitchen Sink.”

Downloads
1980-1985 Vanagon Westfalia Campers: “Supplement to Volkswagen Vanagon Owner’s Manual”
1986-1990 Vanagon Westfalia Campers: “Supplement to Volkswagen Vanagon Owner’s Manual”


Sink Cabinet Cover

Before opening the lid cover, slide the driver’s seat forward to make room.

The left underside of the lid cover has a stainless steel heat shield/drain board. The heat shield can be unsnapped to cover the gas burners. While leaving the sink open for dish washing, the heat shield provides convenient drain board space.

In the Canadian version the heat shield cannot be unsnapped and used as a drainage board.

CAUTION

Do not put the heat shield over and open flame or a hot burner. Never attempt to use the heat shield as a hot plate or grille.

Water Supply

City Water connection

To provide you with the convenience of an ample water supply at campsite, a hose fitting B has been installed in the left side panel of the vehicle.

When city water is not available, you can carry your own supply in the built-in water tank, located in the storage chest between sink cabinet and clothes closet. The water tank can be filled from outside through the lockable filler cap A installed in the left side panel of the vehicle.

Tank capacity is 13.2 US gal. or 50 liters.

Remember that any weight carried affects fuel economy. Consider filling your water tank shortly before you reach the campsite and not at home.

Water pump switch

The electric water pump is immersed inside the water tank. After filling the water tank, and the green indicator light in the control panel comes on, activate the water pump by turning th switch knob on top of the faucet to the left; in direction T (Tank). Turn the knob several times in 10-second intervals to bleed the hose until water runs into the sink.

NOTE: When the city water hose connection has been made, turn the water pump switch knob on top of the faucet in direction C (City).

The water pump and all lights in the control panel can be turned on or off with switch G. The left column indicates how much water is left in the tank. The right light column indicates the condition of the battery explained on page 12.

(C) Green: 13.2-10.5 US gallons (50-40 liters)
(D) Yellow: 10.5-4.0 US gallons (40-15 liters)
(E) Red: 4.0-0.8 US gallons (15-3 liters)

Water Tank Filling

To unlock the filler hose stopper, turn the key clockwise on quarter of a turn and pull stopper out.
To lock the filler hose opening, insert stopper, turn key counter-clockwise one quarter of a turn and remove key.

The water tank vent pipe opening is located above the filler hose stopper.

The protective cover should not be removed, nor must the vent pipe opening be closed off.

Water Drainage

The sink pipe drain extends through the underbody of the vehicle to an opening aft of the left front wheel. The drain pipe opening has a screw-on plastic cap. Remember to remove the cap before using the sink, and always replace the cap securely when the sink is not in use.

Water from the sink drains onto the ground. Therefore, be mindful where you drain the sink water.

The drain plug for the water tank is located under the vehicle in front of the left rear wheel. Always replace the screw-on cap securely after cleaning the water tank.

When danger of frost exists, make sure water is not left in the city water connection. Press screwdriver into the valve opening until water is drained.

Water tank

We recommend you drain the water tank after every trip.

Tilt up storage chest lid.

Unscrew the cover shield and remove the plastic stopper A.

Unscrew the drain plug to empty the tank. Close the drain plug but leave the stopper open to allow the tank to air out. Should there be an odor, flush the tank with a solution of baking soda and water. Rinse the tank thoroughly with clear water and allow it to dry.

Vanagon Westfalia Stove Instructions

NOTE: the following text and photos are excerpted from the 1983 Camper “Supplement to Volkswagen Vanagon Owner’s Manual.” For more info on operating the stove see, “Using the Westfalia Stove.”

Downloads
1980-1985 Vanagon Westfalia Campers: “Supplement to Volkswagen Vanagon Owner’s Manual”
1986-1990 Vanagon Westfalia Campers: “Supplement to Volkswagen Vanagon Owner’s Manual”


Gas Stove

PRACTICE SAFETY AT ALL TIMES!

  • DO NOT USE THE GAS RANGE WHILE DRIVING!
  • Keep combustible materials clear of the lighted burners.
  • The burner orifices have been set by the factory for safe operation. DO NOT CHANGE THEIR SIZE!
  • Keep a lighted match ready when turning on the burners.
  • Keep windows or door open when cooking. Gas flames consume oxygen.
  • Never light the burners to heat the interior of your Camper.
  • Make sure the propane tank is securely fastened in place.
  • Check tank and lines from time to time to be sure they are tight. When testing for leaks, use soapy water. DO NOT USE MATCHES!
  • Do not put the sink cabinet cover over an open flame. Wait til the burners and the cooking rack are cold.
  • After cleaning the stove, make sure to anchor the cooking rack securely in the slots provided.

IN CASE OF FIRE!

The dry chemical fire extinguisher is located behind the passenger seat.

  • Release fire extinguisher from holding bracket.
  • Remove the tape over the white discharge button.
  • Hold the fire extinguisher upright and press the button all the way down.

Aim the spray at the base of the flame. Do not test the fire extinguisher. Partial discharge may cause the contents to leak.