Camp Westfalia

Author Archive for Jeffrey Lee – Page 2

Using the Westfalia Liquid Propane System

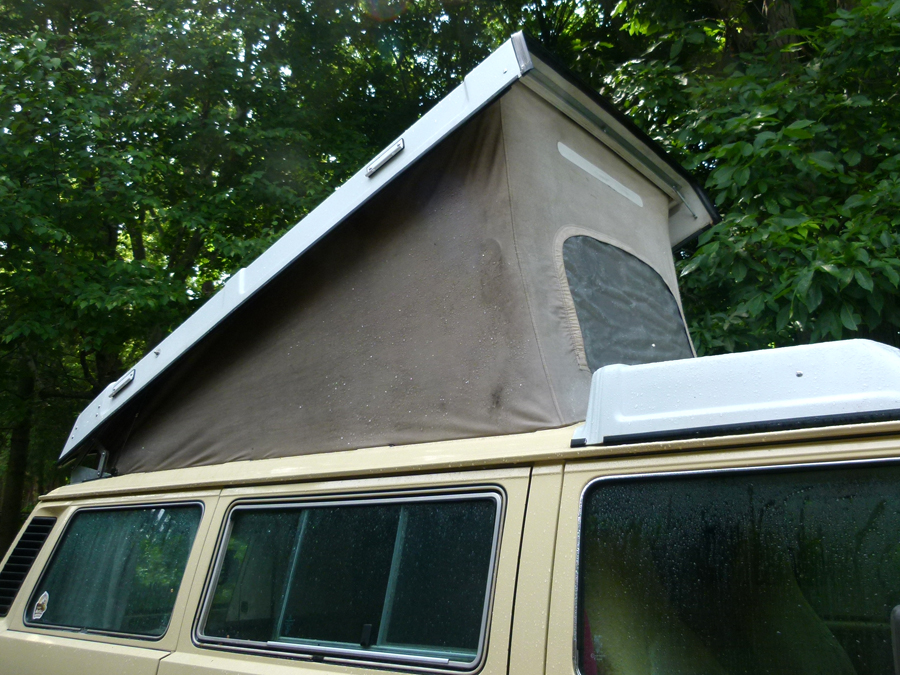
If the galley kitchenette is part of what makes a Westfalia a cozy Camper, then the onboard liquid propane system is the power source of that kitchen.

It provides an exceptionally efficient, affordable, easy, and clean means to run both the refrigerator and the stove.

Let’s have a look at the Westfalia propane system to familiarize ourselves with the various components, and how to use ’em!

Full operating instructions excerpted from the “Supplement to Volkswagen Vanagon Owner’s Manual” for the 1983 Camper can be found here >>

Introduction

The Vanagon Westfalia external LP (Liquid Propane) tank is mounted on the underside of the van, on the left-hand side, and is plainly visible below the Camper hookups. The valves and regulator are protected by a steel shield, and new Campmobiles were delivered with a heavy-duty mudflap behind the left-front wheel to prevent stone damage.

The heavy steel tank is rated for 3 gallons of LP (liquid propane), but is filled to only 80% capacity, to allow room for safe expansion:

  • 2.4 gallons
  • 9.6 lbs.
  • 9.6 liters

Overview

Starting at the rear end of the tank and moving forward, you’ll see the main components:

Overflow Bleeder Valve

The propane technician will open this bleeder while filling your tank to release excess propane vapors, and as an indication as to when the tank has reached its capacity of 80%.

Fill Valve

Under a protective plastic cap is the heavy brass fill port fitting. This is where the technician will connect his filler hose valve to pump pressurized propane into your tank.
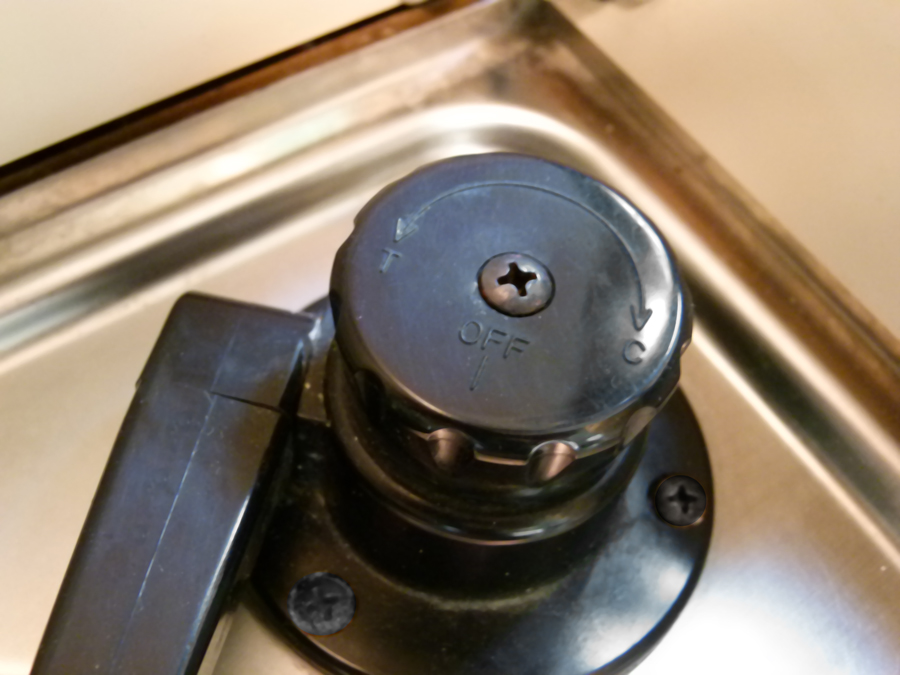
Main Control Valve

This primary valve is what turns On or Off the supply of propane from your tank. As with most such valves, turn it clockwise to turn the propane supply Off; turn it completely counter-clockwise to turn the propane On.

Two-Stage Regulator

Opening the Main Control Valve allows high-pressure propane to enter the first stage of the regulator, which reduces the pressure to about 15 PSI. A secondary stage further reduces the line pressure to about 0.5 PSI for use by the kitchen appliances. The regulator is often covered by a protective plastic housing to keep it clean of mud, etc..

Tee Fitting

Immediately to the left of the regulator the line divides into two supply lines, which pass upward through the floor of the van to provide propane to the kitchen; the upper copper line supplies the refrigerator, while the lower line provides gas to the stove.

Filling

The Westfalia LP tank accepts a standard fill nozzle found at most commercial propane dealers, such as RV service centers, U-Haul outlets, many hardware stores, and some campgrounds. Unfortunately, many younger or inexperienced LP technicians may be unfamiliar with the Westy’s older design. So, if you find a place that you like, continue going there for your propane refills.

Compared to most other RVs, the Westfalia’s LP fill port is mounted quite low to the ground, and is relatively difficult to access. You can make things easier for your propane guy by parking near the LP station, laying out a padded foam kneeling pad or carpet scrap, and removing the plastic cap from your fill valve. Make sure the main control valve is OFF before filling. I also like to ensure that the overflow bleeder valve is working freely by briefly loosening & tightening it beforehand, so the tech doesn’t need to twist on it with a pair of old pliers. Wear a heavy glove when doing this, to avoid severe cold-burns from escaping liquid propane.

At only 3 gallons, the Westy’s tank is barely half the capacity of a typical BBQ propane tank, and is likely one of the smallest tanks many techs will encounter. So, it tends to reach capacity sooner than expected unless completely empty, and results in only an eight-dollar sale.

Let the tech do his thing, and consider tipping him for his troubles. Replace the filler valve cap, and make sure the overflow bleeder valve is fully closed (an LP tech once left mine somewhat loose, resulting in a slow but dangerous LP leak).

Driving

Though legal to drive while using the propane to power the fridge, save the LP and switch the fridge to 12 VDC while underway.

Liquid Propane Consumption

Though the tank is small, both the stove and the fridge are quite efficient, so a refill lasts a good long while. In normal usage, even running the fridge 24/7 and cooking 1-2 hot meals each day, a single tankful will last an entire month.

The Westfalia propane tank has no gauge to tell you how much LP is left, so after a refill, start a simple log book to keep track of your typical camping days, so you have some idea of how much fuel you can expect from a tankful.

Maintenance

The LP system requires virtually no periodic maintenance, other than routine washing of the tank exterior, valves, and regulator. Periodically inspect these parts, the tank body, and the supply lines for dents, scrapes, or other damage. If you ever smell the distinctive odor of liquid propane, immediately make sure the main control valve is closed. You can also spray soapy water on any of these components; if the soap mixture forms bubbles, there is a leak.

If ever in doubt, see a qualified RV propane service center for repair or replacement of your tank or other components.

Finally …

As the main fuel source for the stove and refrigerator, the liquid propane system is a key player in the Westfalia Campmobile, and provides easy, economical, and reliable convenience.

Have any questions or comments about the Westfalia liquid propane system? Post ’em below, and use the social links to share with friends!

Instructions for the Westfalia Liquid Propane System

NOTE: the following text and photos are excerpted from the 1983 Camper “Supplement to Volkswagen Vanagon Owner’s Manual.” For more info on using the LP system see, “Using the Westfalia Liquid Propane System.”

Downloads
1980-1985 Vanagon Westfalia Campers: “Supplement to Volkswagen Vanagon Owner’s Manual”
1986-1990 Vanagon Westfalia Campers: “Supplement to Volkswagen Vanagon Owner’s Manual”


Propane Gas Tank

The liquid propane gas tank is located under the left side of the vehicle. The equipment includes two pipe lines; one for cooking and one for refrigeration. Instructions for refilling the tank are listed on the sticker and in a separate pamphlet. The propane gas tank capacity is 3 gallons/12 liters.

Vanagon Coolant Pipe Mounting Bracket Set

Replacing your Vanagon/Transporter’s leaky old steel or plastic coolant pipes with new aftermarket stainless steel pipes?

These brackets securely anchor your new coolant pipes and heater hoses, keeping them snug and out of the way.


Easily attached to the bottom of a chassis member with the included stainless steel hardware, the slick one-piece brackets replace your old rusted thin wire brackets or broken plastic zip-ties to mount your new pipes and heater hoses.

Includes TWO brackets to mount pipes and heater hoses, with stainless steel mounting hardware.

FITMENT

1.25″ Brackets: 1983 to early 1985 Vanagons equipped with 1.25”-diameter STEEL coolant pipes.
1.50″ Brackets: Late 1985 thru 1991 Vanagons equipped with 1.50”-diameter PLASTIC coolant pipes.

(Simply order the bracket size to match the size of the new aftermarket pipes you intend to use.)

FREE SHIPPING to lower 48 states. For an estimate for international destinations, please use the Contact form on this page to provide your shipping info.


Choose Bracket Size


Evolution of the Vanagon/Transporter

Do you consider yourself a Van-Fan?

Do you enjoy “Vanagon-spotting”, identifying various years and types of VW vans while on a road trip?

Or have you just begun shopping for your own Westfalia, and find yourself a bit baffled by the features of each variant?

Here’s a quick guide to the Vanagons/Transporters offered in North America between 1980 and 1991. Obviously, some of the component specifications of each model are more detailed than can be outlined here, but it should help in your own on-the-road “Vanagon-spotting” ventures!

Feel free to grab the graphic or share the article with friends or on your own blog or website!

If you’re interested in exploring the very early developmental ‘genealogy’ of the T3 Vanagon & Transporter, check out this thorough and fascinating read!

For more detailed info on the model history of the Vanagon & Transporter, please visit WestfaliaT3.info

What do you think? Leave a question or comment below, and use the social links to share with friends!

Setting Up Your Camper Van Kitchen

How to outfit and organize your campervan kitchen to make the most of your precious cooking and clean-up time!

The Westfalia Camper boasts a small galley kitchenette which includes a refrigerator powered by AC/DC electricity or by liquid propane, a two-burner LP stove for cooking, and a sink for food prep and cleanup. Storage for food and kitchen wares is provided by several cabinets.

Like most campervans and other small motorhomes, space is at a premium, so smart use of limited resources will help you stay organized and make cooking easy and fun. Here are some ideas for outfitting your own camper van kitchen.

Feel free to grab the graphic or share the article with friends or on your own blog or website!

Storage

Dry packaged and canned goods are perhaps best kept in the two rearmost top-entry cabinets. A compact tea kettle with folding handle may fit inside the sink, along with Camp-Suds and scrubby for dishwashing.

Cutlery, knives, can opener, and most other cooking utensils will fit in the small drawer below the sink.

The large cabinet below provides pretty ample storage for pots, pans, griddles, and food storage containers. A dishpan serves as a handy ‘drawer’ to organize most cooking wares, and can also be used for its original purpose.

To prevent jostling and annoying rattles while driving, place thin rubber shelf liners inside cabinets, and dish towels and pot holders or trivets can be laid over the stove burners.

Just as at home, you’ll want to store leftovers or other unused foods for later use. Lightweight plastic food containers with snap-on lids save space, both when nested for storage, and when stacked for keeping food. Work well for dry goods and refrigerated items. Smaller quantities can be kept in zipper-lock plastic baggies. A few chip clips for resealing plastic food and snack bags.

Work Surfaces

Space for food prep is in short supply in the Westfalia, so be smart and creative.

The original Westy table can be mounted either directly behind the driver’s seat, or above the rear kitchen cabinets, and can be pivoted in a range of positions for best use.

If not immediately using the stove burners, flip down the stainless steel drain board, or close the lid completely to use the countertop surface.

When the popup roof is raised, there is a large ‘shelf’ offered by the folded upper bunk; this is a great place for ingredients, cookware, and utensils you’ll be using immediately.

A large cutting board makes for an additional, portable work surface for chopping vegetables, assembling sandwiches, and other food prep. Get one with raised edges to help contain messes.

Cooking

Modern cooksets made for camping and backpacking offer several advantages over pots and pans from your home kitchen. Most can be nested inside one another, or feature folding handles, to save space and reduce clutter. They’re often made of aluminum or other lightweight materials. Many feature bottoms optimized for better heat dispersion when cooking on a camp stove or small burner, to avoid scorching.

Most such cooksets include a small- and a medium-sized pot, a small frypan, and a lid and handle/gripper to fit them all. When cooking for two, a 1 1/2-quart and a 2-quart pot should be sufficient; larger sets are available for larger crews.

Though small, the included frying pan does have its uses for light-duty heating, but you’ll probably want a larger pan for most frying, sautéing, and flapjacking. If your pan doesn’t include a lid, pick one up in a thrift store.

Oven mitts or pot holders protect your hands and countertops when handling hot pans.

A small set of kitchen knives of various sizes with snap-on sheathes will provide all your chopping, dicing, and mincing needs.

Two or three mixing bowls of various sizes; double as serving bowls for chips and other snacks.

Other typical cooking utensils: spatula, spoons, ladles. Smaller, lightweight camping versions save space and weight. Can opener, bottle opener, and corkscrew. Small multi-spice shakers. A grater for cheeses, vegetables, and other foods. A collapsible strainer for draining pasta.

Serving

Cooking in your campervan can be fun, but eating is even better! Again, lightweight and compact is the key here, and dining wares made for camping & backpacking are the ticket.

Stacking, plastic plates and bowls are durable and quiet, and help keep your food warmer longer, especially when dining outdoors.

Matching polycarbonate cutlery offer the same advantages: knives, forks, spoons, even the thrifty and versatile spork.

The same thermal beverage mugs or cups used when driving can be utilized at the dinner table, or use dedicated plastic cups and glasses for meal time.

Use placemats or a heavy vinyl tablecloth on untidy outdoor campsite picnic tables, especially if the previous occupant gutted a couple of brook trout on the table, or was an incontinent seagull …

Clean-up

Seldom the favorite part of mealtime, there’s no need for tidying up to be laborious. Like cooking, let’s keep it quick and easy.

Stow any leftovers away in the storage containers mentioned above. Scrape any heavy remainders from cookware using a thin plastic pot scraper.

A five-gallon plastic bucket with a padded seat, often used by hunters and fisherfolk, also serves as a convenient container for trash and recyclables when lined with a couple of trash bags.

Water can be heated in a teakettle while you eat, then used for dishwashing and cleanup. Simply pour it into the Westfalia kitchen sink or a separate dishpan, and add cold water to temper.

Conserve your biodegradable Camp-Suds by applying a few drops directly to your non-scratch scouring pad. Start by washing your least-dirty cups, cutlery, and plates first, followed by the messier, greasier pots and pans. Rinse cookware directly in the kitchen sink, and set out on the drain board to dry.

Synthetic microfiber dish towels are extra-absorbent and quick-drying.

Dirty dishwater should be collected in a gray-water container, and not drained directly on the ground. Empty the container in a campground toilet or a designated dishwater-collection receptacle.

BONUS

Any ways in which you can get double duty out of your kitchen gear will save you space, expense, and time!

  • A large cutting board with raised sides can also be used as a serving platter for sandwiches, wraps, and other foods.
  • A flat grater for shredding vegetables and cheese takes up almost no space, and doubles as a pasta strainer!
  • Experienced backpackers often eat from the same pot in which they cooked, using the same spoon with which they stirred, to minimize clean-up time.
  • Slip dish cloths between pots and plates to protect non-stick coatings, and store towels and pot holders on the stove burners to help reduce annoying rattles while underway.
  • Mixing bowls can also be used as serving bowls for snacks, or use food storage containers for both!

Finally …

With some basic camp-cooking and serving wares, and some smart packing, you can make the most of your Westfalia Camper kitchen.

Find more ideas for packing and organizing your entire van here!

Got any Westy kitchen cooking & clean-up advice or tips? Leave a suggestion or question below, and use the social links to share with friends!

Product Review: TOPDC 100PSI Double-Cylinder Portable Air Compressor

A lightweight, compact 12-volt air compressor for refilling tires and other inflatable equipment


DISCLOSURE
Camp Westfalia was provided with a product sample at no cost in return for an authentic review of this product. All thoughts and opinions expressed here are those of Camp Westfalia, and are not otherwise influenced by the manufacturer or its affiliates.


Integrated 0-150 PSI Gauge

Specifications

  • Operating Voltage: DC 12V
  • Max Power: 250W-300W
  • Air Flow: 60L/min
  • Maximum Pressure: 100 PSI
  • Size: Approx. 9.6 x 3.75 x 6.25″ (24.5 x 9.5 x 16cm)
  • Weight: 6.4 lbs, 2.8kg-3kg

Vanagon and other van-travellers tend to wander off the beaten path, often finding themselves far from major highways, and perhaps beyond reliable phone reception. A flat or leaking tire on the interstate is a big inconvenience, but the same flat tire on a remote byway can be downright dangerous for you and your family. Self-reliance is crucial, and a portable compressor like this can be a real trip saver.

This portable automotive air compressor is lightweight and surprisingly compact. But can it get the job done?

First Impressions

When I first unboxed the TOPDC Double-Cylinder Air Compressor, I was a bit surprised by it’s small size and light weight. It seemed solid enough, but I wondered if such a diminutive device could properly inflate the larger, light-truck tires used on most Vanagons.

Still, its cast alloy cylinder heads, main motor housing, and reinforced case all seemed to make for a pretty durable little unit.

A folding top handle makes it easy to carry, and to lift in and out of the Vanagon bench seat. There’s an LED work light integrated into one end of the case, controlled by a dedicated switch, to shed some light on nighttime flats or other breakdowns.

Unlike most other compressors of this size and price, this TOPDC Air Compressor model features twin cylinders, which evidently makes for higher pressures, faster inflation times, lower noise, and less vibration.

The primary power cord plugs into a cigarette-lighter socket. Also included is an adaptor to run the compressor directly off your main starting or auxiliary battery, a 10-foot coiled extension air hose, and three nozzle adaptors for inflating air mattresses, soccer balls, pool toys, etc..

Everything tucks neatly away inside the included zipper bag, to keep all the loose bits clean, undamaged, and organized.

Get the TOPDC Double-Cylinder Air Compressor here

On The Road or In Camp

To simulate a flat tire, I pounded a 2-inch roofing nail through the sidewall of a low-miles Hankook. Just kidding. Actually, I just unthreaded the valve stem of my Vanagon spare and allowed it to completely deflate while I ate lunch.

For maximum power during my test, I connected the TOPDC Double-Cylinder Air Compressor directly to my starting battery using the included clips. Both the primary air hose and the coiled extension use screw-on connections, so you don’t need to hold the hose onto the tire’s valve stem; just flip the switch and stand by.

Small compressors like this are generally able to provide high pressure but at low volume, so they tend to be slow. While the little unit chugged away, I wondered how long it would take to completely fill the rather large Vanagon tire:

  • At 2 minutes, it had inflated the tire to 25 PSI.
  • At 4 minutes, it had inflated the tire to 35 PSI.
  • At 6 minutes, it had inflated the tire to 48 PSI

All in all, pretty speedy.

NOTE: flat tires should always be inflated while bearing NO VEHICLE WEIGHT, to ensure the tire bead is securely seated on the rim, and so that the compressor is not over-working to lift the vehicle. Either jack the vehicle up so that the wheel is clear of the ground, or remove the wheel from the van entirely. Tires that are only a bit underinflated can be topped up while mounted.

Built-in LED Work Light

Using the 8-foot power cord and extension hose, all four Vanagon wheels are easily reached from the dashboard power socket.

The included instructions warn users to allow the compressor to cool off after 10-15 minute’s use, but after completely filling my tire, I found the cylinder heads and motor casing only very warm to the touch. If inflating something larger like an air mattress, do it in 10-minute intervals to prevent overheating.

When compared to my shop-grade handheld pressure gauge, the compressor’s built-in gauge was accurate to within 1 PSI.

Finally …

Considering its compact size, weight, and versatility for other tasks, there’s no reason not to carry one of these as part of your emergency tool kit. The TOPDC Double-Cylinder Air Compressor fits neatly in the storage space beneath the Vanagon bench seat, and gives us the assurance and peace of mind when travelling in the backcountry

Hits: quality construction, compact & lightweight design, fast inflation, long cord and hose for extended reach, included carrying bag & accessories
Misses: slightly more spendy than lesser portable automotive compressors

Get the TOPDC Double-Cylinder Air Compressor here

What do you think? Leave a question or comment below, and use the social links to share with friends!

Making Custom Rigid Hydraulic Brake Lines

Replace the old, rusty, unsafe steel brake lines on your Vanagon (or any other vehicle, for that matter).

After 30 or 40 years, the original steel brake lines on your Vanagon/Transporter may well be past their reasonable service life, especially if you live in a wet region where corrosive road salt may be used on roadways.

Pre-bent, direct replacements are no longer available for the Vanagon, though one can purchase complete sets of straight sections of the correct lengths with the flare nuts already installed; these must then be bent to shape.

An alternative is to fabricate new lines from stock off-the-shelf materials. When I recently replaced a few brake lines on a Vanagon, the new Cunifer or copper-nickel line seemed a good solution, and is quite popular among do-it-yourself auto enthusiasts, so I purchased a big roll of the stuff and a decent flaring tool.


But I had trouble making satisfactory flares with a few different sub-$100 tools. Many others have had great success with the copper-nickel lines, so the problem was either with my consumer-level flaring tools or my technique.

In any case, brakes are no place for questionable results, so I saved that particular skill for another day, and decided to use conventional poly-coated steel brake lines with pre-formed flares and nuts already installed. These are readily available, affordable, and should last another 30 years.

NOTE: throughout North America these rigid, hard brake lines are commonly known simply as ‘lines’, while the Bentley Workshop Manual and most of Europe refers to them as ‘brake pipes’. Tomatoe, tomato.

These ready-made brake lines are available in a variety of diameters, lengths, and flare-fitting types. The Vanagon requires 3/16″ (5mm) diameter with 10mm x 1.0mm DIN/ISO bubble flares. You’ll simply need to bend to shape and install.

In short, you’ll remove the original brake line(s) from the vehicle, measure their total lengths and save them as patterns, then bend new steel lines to fit, and install. Finish by bleeding the brake system as usual.

PARTS & MATERIALS

Optional:

TOOLS

Optional:

  • Stiff wire for making patterns, several feet

Bending Basics

A hand-held tubing-bender tool like this one is quite versatile for bending a variety of curves in brake lines, and usually includes a few different sizes of roller dies for various diameters of tubing.

I generally start by marking the tubing to indicate the first tangent—the beginning of the intended curve or bend. Set the tubing into the bending tool with this mark adjacent to the die, then carefully begin bending, making sure the curve is applied beyond the tangent mark.


For smooth, continuous curves, bend the tubing a little at a time, working your way along the length of the curve a few times, bending it a little tighter each time until it matches the original.

  1. Remove the old brake line from the vehicle, being careful to avoid bending it too badly out of shape. Add a label to indicate its location and orientation, to prevent confusion.
  2. Measure the total linear length of the old line, including bends and curves; a tailor’s measuring tape is useful for this, either on or off the vehicle.
  3. Select a length of new brake line slightly longer than your original. Off-the-shelf brake lines are typically available in increments of approximately 10″ (20″, 30″, 40″, etc.), so you’ll need to buy pieces slightly longer than needed. ISO/DIN Bubble flare couplers can be used to join two shorter sections.
  4. Before beginning to bend, make sure the flare nuts are each at their respective ends of the line, and use a bit of tape to keep them in position and prevent the intrusion of dirt or other contaminants. Find a clean, flat work surface.
  5. The extra length of the lines must somehow be accounted for in order to fit your intended use. So, if the new piece is, say, 6″ too long, you’ll need to add a 6″-circumference (NOT DIAMETER) loop somewhere in the run, in order to take up this ‘slack’. Choose a final location someplace out of the way, where it will not interfere with adjacent hoses or wires once installed, or be damaged by road debris.
    NOTE: If necessary, the additional length can be spread out over two smaller loops.
  6. After choosing roughly where in the line you plan to add this loop later, begin making the other bends in the new line, starting at the nearest end. Using the old brake line as a pattern, use the bending tool to make the first bend.
  7. After making the first bend, begin paying attention to the third dimension and the axial orientation of the new line when comparing to the old, to ensure you’re making an accurate replacement that will fit properly. Add the next bend, and so on, until you come to the intended location of your loop.

Loop-de-Loop

NOTE: You may want to practice this technique on an extra piece or scrap of brake line. You can even use a length of stiff wire to make a pattern and to test-fit before beginning to bend, as shown above.


  1. Mark the loop’s location “A” on the chosen section of line.
  2. Determine the required circumference of the loop; Ex.: 6″. Make an additional Mark “B”, located 6″ PAST Mark “A”. These two tangent marks indicate the beginning and end of the loop.
  3. Starting at Mark “A”, use the bending tool to ‘loop’ around 360 degrees until Mark “A” comes around full circle to align with Mark “B”, creating a 6″-circumference loop.
    NOTE: I prefer to make such loops oriented horizontally to avoid the collection of air bubbles when bleeding, and I coil them in a direction that will encourage air bubbles to migrate downstream toward the bleeders.
  4. Continue making the remaining bends to the end of the line, comparing to the old brake line as you go.
  5. Once you have a faithful copy of the original brake line, you can install it on your van! Replace any broken or missing retaining springs or clips along the way.

Finally …

This bending and looping technique allows you to use readily available, affordable, conventional poly-coated steel brake lines, and should last for many more years of vintage motoring!

What do you think? Leave a question or comment below, and use the social links to share with friends!

Trout fishing on the Upper Little Wolf River


Using the Westfalia Kitchen Sink

The galley sink, like many other Westfalia components, is a handy and compact feature that makes cooking and kitchen cleanup easier, with no need to haul big jugs of fresh water around, or to wash your dishes out in the rain and bugs.

With a Vanagon Westfalia Camper, you have everything AND the kitchen sink!

Full operating instructions excerpted from the “Supplement to Volkswagen Vanagon Owner’s Manual” for the 1983 Camper can be found here >>

Introduction

Tucked away beneath the main galley cabinet lid is the stainless steel sink, right next to the two-burner stove. The sink’s water is supplied by one of two sources:

Onboard water tank
Concealed beneath the rearmost galley cabinet is a 13.2-US-gallon (50-liter) plastic water storage tank. It is easily filled from a home or campground water hose via the external filler port, the rearmost of the three hookups located on the driver’s side (before filling the tank, be sure the drain cap on the underside of the van is secured). You’ll need a key to unlock the filler port, to prevent tampering. Inside the tank is a small submersible water pump, which sends water to the sink via a hidden hose routed behind the cabinets and fridge.
After a trip, this supply tank should be drained and cleaned and dried, for proper hygiene; see below.

High-pressure ‘City’ water connection
This is the forward-most of the external camper hookups, and accepts a standard garden hose. Connect the other end to a campsite water supply. The standard city water supply pressure of 40-50 PSI may be too much for the old plastic connectors and supply hose inside the van, so you may consider an aftermarket pressure regulator made for this purpose.

At 10.5 inches (265 mm) in diameter, and just 1.7 gallons (6.4 liters) capacity, the sink is … of humble proportions. But it’s large enough to fit a few plates and a couple of bowls, and is perhaps best used for washing dirty dishes individually.

It’s also just the right dimensions to store a vintage tea kettle (color matched to our Ivory Vanagon, and featuring the same number of dents), which I picked up in a thrift store several years ago while travelling. Such a kettle, or a modern equivalent, is great for heating water for instant oatmeal, coffee, or dishwashing. Or, of course, for tea.

Just to the left of the sink, mounted to the underside of the kitchen cabinet lid, is a protective heat shield. On Canadian models, this deflector is permanently affixed; on US models, this heat shield can be unsnapped and hinged downward to lay flat, to serve as a drain board when washing & drying dishes (note the angled surface and small drain slot over the sink).

NOTE: Many new Westfalia owners mistakenly assume this heat shield/drain board is a griddle or hot plate. It is not, and this will quickly discolor and buckle the heat shield, and food will stick and burn. DO NOT USE IT AS COOKING SURFACE.

Checking the Water Level

Turn on the main switch (G) on the kitchen control panel. The left column of lights indicates the remaining volume of fresh water in the storage tank as follows:
(C) Green: 13.2-10.5 US gallons (50-40 liters)
(D) Yellow: 10.5-4.0 US gallons (40-15 liters)
(E) Red: 4.0-0.8 US gallons (15-3 liters)

Turning on the Taps

Before using your kitchen sink, be sure to remove the drain cap located on the underside of the van, just behind the left-front wheel. Replace after using.

The knob on top of the sink faucet controls the water flow: turn the knob counter-clockwise in the direction of the “T” mark to activate the tank pump and draw water from the onboard storage tank, turn clockwise toward the “C” mark to draw city water when connected to an external supply.

If your sink has not been used in some time, it may take a few tries for the pump to prime the supply lines and for water to flow from the tap.

You can also install an aftermarket hands-free foot switch to turn the tank pump on/off, which makes rinsing dishes and cookware easier.

Draining

Just like your kitchen sink at home, the Westy sink has a drain stopper/strainer so you can fill the sink right up. When done washing, simply rotate the stopper to allow the water to drain out, straining large food particles and debris which might otherwise plug your P-trap or drain line.

Whether camped in an established campground or in the backcountry, it’s important that “gray” water—used dish and hand washing water—not be dumped on the ground. Connect a hose to the drain outlet on the underside of the van and run this to a campsite wastewater collection hookup, or use your own portable gray water collector.

Water System Care & Maintenance

After each trip, as part of your basic routine, pour a half-gallon of hot fresh water down the sink drain to flush any debris from the P-trap, then rinse and dry your gray water bag.

Remove the cap from the bottom of the water storage tank to drain the unused water, and maybe drive around like this for a bit to allow any remaining water to slosh out.

If you notice stale tastes or odors from your Westfalia water system, try adding an ounce of RV water freshener to each tankful. This can help reduce the taste of plastic, metal or sulfur, and eliminate algae and slime buildup in your water tank.

For more seasonal care to keep your water system clean and healthy, see “Winterize Your Westfalia for Storage.”

Finally …

Along with the stove and refrigerator, the water supply and sink system is just another of the ingenious features that makes a Westfalia Camper a home. We use ours regularly, and besides the periodic cleaning and maintenance mentioned here, have only recently had to replace the original 35-year-old main water pump.

It’s a convenient feature for meal prep and cleanup, and provides cool drinking water and hot coffee in the morning. Heck, I once even replenished a leaking engine coolant system with water from the kitchen sink!

Have any questions or comments about the Westfalia kitchen sink and water supply? Post ’em below, and use the social links to share with friends!

Cleaning and Waterproofing your Westfalia Canvas Tent

How to clean and waterproof your Westy canvas tent to keep you warm, dry, and comfortable!

Westfalia Canvas Tent Overview

The canvas tent walls are an integral part of the Volkswagen Westfalia Camper’s popup roof system, keeping out wind, rain, snow, and even bugs. Every part of a three-decades-old camper van will benefit from frequent care and maintenance, but the tent canvas is perhaps the softest and most fragile component. Rain can soak the fibers and allow water to intrude into your cozy abode. Worse, if left untended, this same moisture can rot holes in the canvas fabric, requiring patches or an expensive replacement.

But with a little proper care, you can keep your original Westy canvas supple, dry, and working well for many more years.

The Westfalia Camper tent is made of a medium-weight cotton canvas, which is not inherently waterproof, but which instead relies on the swelling of the natural fibers to create a water-resistant barrier when wetted. The canvas should be periodically cleaned and then treated with a silicone water-repellent product like Kiwi Camp Dry Heavy Duty Water Repellent. This forms a moisture-resistant layer which repels rain but which also allows interior moisture to escape. Such treatments eventually wear out due to simple use, UV from sunlight, dirt, etc.. If using your Camper regularly, you should re-treat your tent every 1-2 years.

NOTE: Always test any product on an unobtrusive part of your tent before proceeding. The following is for the stock original Westfalia canvas tent. Aftermarket replacement tents may require their own cleaning and treating products; see the instructions from the supplier.

Parts & Supplies

Optional

Tools

  • Short ladder or step stool
  • Garden hose
  • Wash bucket
  • Brushes: soft-bristle, long-handled; small firm hand-held
  • Plastic sheeting, magnets or spring clamps

Optional

  • Household clothes iron

Washing the Westfalia Popup Roof Canvas

  1. On a warm, dry day, park your van somewhere out of direct sunlight and raise the popup roof. Close the front and/or side tent windows. Use a garden hose to gently wet the entire canvas tent.
  2. Allow the tent canvas fibers to absorb the water for a few minutes. Meanwhile, mix up about a gallon of water with Woolite Extra Delicates Care gentle liquid detergent. Use a soft long-handled brush to apply the sudsy Woolite to one wall of the canvas tent. Soak a few minutes to allow the detergent to work, then rinse thoroughly with the garden hose.
  3. If stubborn dirty spots or stains remain, use a stiffer handheld brush to apply Woolite full strength to the stains and gently work it into the fabric. Work the brush in a circular pattern over and around the stain to ‘feather’ the detergent into surrounding areas, to avoid leaving an obvious brighter clean spot. Let the detergent work for five minutes, then rinse well with the hose. Repeat this for all four sides of the canvas, rinsing well.
    NOTE: to remove especially stubborn stains, use OxiClean Laundry Stain Remover to pre-treat these problem areas.
  4. If needed, the tent interior can be washed similarly, but using the soft brush for applying both the wash water and rinse water; this may require two rinses to thoroughly remove all traces of detergent. Use large towels to protect the interior from excess water.
  5. Allow the tent to completely air-dry, perhaps even overnight. If possible, open the tent’s window(s) to help dry the canvas.

Repairing the Canvas

Now would be a good opportunity to repair any punctures, tears, or other damage to the canvas or window screen.

  1. Once thoroughly dry, trim the loose edges of any holes or tears. Cut iron-on fabric-repair patches at least an inch larger than the hole, and round the patch corners to prevent peeling. Follow the directions to apply the patches to the canvas tent exterior, using a household clothing iron.
  2. For a firm bond, have a helper stand inside the tent and press a small wooden board wrapped in a towel against the back of the repair, while you firmly iron the patch in place.

Water-Repellent Treatment

  1. As above, treat your Westfalia tent on a warm, dry, calm day out of direct sunlight.
  2. Most suitable canvas waterproof treatments contain silicone, which will leave a slippery mess on the rest of your van. So, cover your paint and other bodywork with plastic sheeting held in place with magnets or spring clamps. I use an old vinyl shower curtain.
  3. Follow the directions on the can of Camp Dry or similar silicone canvas treatment, to spray the entire exterior surface of the tent from 7 to 10 inches away with a light, even coat. Work on one wall of the tent at a time, then proceed to the next. Camp Dry suggests applying a second coat after four hours for maximum protection, and I usually use horizontal strokes for the first cost, and vertical strokes for the second.
  4. Avoid thoroughly soaking the canvas with water repellent, but be sure to fully treat the seams and bottom edges of the tent.
  5. Allow the treatment to completely dry (24-48 hours) before closing the Westfalia roof. You may experience lingering odors from the waterproof treatment on your next few camping trips, but these will fade with time.

Finishing

The detergent will have stripped the protective wax from your bodywork, so give your van a good washing and waxing now, along with a fiberglass wax for the popup roof; apply an anti-UV protectant to all the rubber seals.

Conclusion

With proper care, your Westfalia popup canvas should not require frequent washings as outlined above, but will benefit from a simple rinsing with a garden hose after especially dusty or dirty camping trips. The waterproof treatment can be reapplied every one to two years for maximum protection, and will keep you and your family dry and comfy!

What do you think? Leave a question or comment below, and use the social links to share with friends!