Related Topics:
Hydraulic Clutch System Overview
Clutch Slave Cylinder Replacement
Bleeding the Clutch Hydraulic System
 Before getting started, check out the “Vanagon Hydraulic Clutch System Overview”
- Start with some vigorous stretching exercises and calisthenics as taught by your junior high school Phys. Ed. coach; the clutch master cylinder in particular is very well tucked away beneath the dash and there is no comfortable way to work on it without assuming a variety of contorted postures and compromising positions.
- I suggest you use ramps or jackstands to raise the rear of the Vanagon. This will later encourage the inevitable air bubbles in the hydraulic line to migrate back to the slave cylinder, where they can easily be bled out. Set the parking brake and engage the transmission in reverse or first gear.
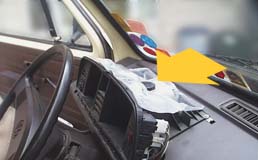
- Remove the shroud covering the instrument cluster, to gain access to the hydraulic fluid reservoir. Also remove the lower steering-column cover by removing the two screws and carefully working it loose.
- Lay down your plastic sheeting and tape it snugly around the base of the steering column. Hydraulic fluid will infiltrate carpeting and dissolve paint, so do all you can to prevent it getting on painted bodywork. Use cold water or rubbing alcohol to clean any spills.
- The hydraulic reservoir contains several ounces of fluid, and if you simply disconnect the braided rubber supply hose leading to the clutch master cylinder, about half of this fluid will drain out and onto the floor, so have a catch can ready. Or either use a turkey baster to remove enough fluid so that the level falls below the supply hose outlet, or use hose-clamping tool to gently pinch off the supply hose. Then carefully wriggle the hose loose from its plastic nipple on the master cylinder.
- From your new or old slave cylinder, borrow the rubber dust cap for the bleeder screw and keep it handy. Begin loosening the pressure fitting on the metal high-pressure line exiting the back of the master cylinder, then remove the two retaining bolts which hold the master cylinder to its bracket.
- Completely remove the metal line from the master cylinder. To prevent several ounces of hydraulic fluid from dribbling onto the floor, temporarily slip that rubber dust cap over the end of the line. By pinching off the rubber supply hose, and plugging the end of the metal line, you should have no more than a tablespoonful or so of hydraulic fluid to clean up. NOTE: Vanagons built prior to 1987 utilize a union-nut pressure fitting for this application, while later models use a bolt-through banjo fitting with two copper washers. If yours uses the latter style, be sure to replace these washers when re-installing.
- Carefully lower the master cylinder from its place, being mindful of the pedal-actuated rod which will slip from the rubber boot atop the master cylinder.
- Installation of your shiny new master cylinder is pretty much the reverse of removal, starting by carefully slipping the actuator rod into the master cylinder’s rubber boot. After removing the rubber dust cap from the end of the metal line, you may find it easier to start threading the high-pressure union into the master cylinder if you do so before mounting the master cylinder. Tighten the master cylinder’s mounting bolts to 18 ft./lbs, and the high-pressure line fitting to 12 ft./lbs..


Once everything is satisfactorily reconnected, you can either proceed to “Vanagon Clutch Slave Cylinder Replacement” or, if not doing so, skip ahead to Bleeding the Vanagon Clutch Hydraulic System.
 Essentially, the clutch pedal actuates a hydraulic piston-and-cylinder assembly—usually referred to as the “master cylinder”—tucked away just above the base of the steering column. This master cylinder pushes hydraulic fluid through a 10-foot-long pipe running to the engine compartment, where it is connected to a similar piston-and-cylinder assembly known as the “slave cylinder”. This slave cylinder in turn actuates a lever on the side of the clutch bellhousing to engage & disengage the clutch.
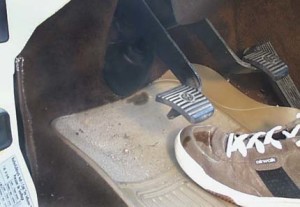 Typically, the first sign of trouble in the clutch system is hydraulic fluid dripping from the master cylinder onto your shoe, carpet, steering column, etc.. Or perhaps a leak surrounding the slave cylinder back in the engine compartment, accompanied by an increasing consumption of fluid.